

You are here: Home
|
|
|
You are here: Home |
Where have all the good pork pies gone?Finally, on the 1 May 2010 (our fourth wedding anniversary) - and thanks to a recommendation from Johnny Pusztai, our wonderful Nottingham butcher - we found a truly outstanding pork pie. And the really good news? The shop is less than half an hour’s drive from home and on the way to our nearest Waitrose! I’ll leave the epic below for the millions who can’t just pop to Milton in North Notts. This link had failed when I tried to contact Mellors Farm Shop, Milton, Tuxford, Newark, DN22 0PP - 01777 870354 just before Christmas 2011, but when I visited the shop - thankfully still thriving and producing their great pies - they could only say they didn’t know what had happened to the site! I’m leaving the link here in the hope that the site reappears soon. And yes, Tuxford is where my bread flour is milled - what a neighbourhood! Gradually all the pork pies I have loved for years have been disappearing. Patricia thinks it’s something to do with health worries about the jelly - and certainly it’s the jelly I miss: not just the layer surrounding the meat, but the jelly that penetrates the little voids in the meat (left when fat melts away in the cooking) and gives it that juicy succulence. There isn’t enough jelly round the meat - often just a big air-filled space, but I think there isn’t enough fat in the pork either. So I’ve decided that the time has come to go proactive and try making my own pork pies. The project started on the 14 January 2008. The jellyNever one to do things by halves, I decided to produce a large batch of pork jelly first. This would be the most time-consuming part of the pie-making, and I might need quite a lot before I got the filling right. In the freezer was a large bag of thick pork-belly rashers, left behind by the sadly brief barbecue season of 2007. There were also two hefty pork hocks, left from four I had bought from our village butcher (now closed down) - the other two had been used in an experimental tapa for a Spanish-themed evening we held in the Autumn. I decided to sort out the hocks first. After defrosting, they went in a very large pan, along with three leeks, half a dozen carrots, four sticks of celery and a few onions, all sliced. The whole lot was covered with water and brought to the boil before being moved to an oven set at 120°C. They were then ignored for three hours, at the end of which a prod with a knife showed them to be tender. They were ignored some more - left to cool in the broth overnight. The following morning they were fished out and left to drain while the broth was brought to the boil and left to bubble merrily without a lid. When they were dry enough to handle, they were stripped of edible meat - not a lot, but it would make a sort of brawn with some of the jelly. The skins, bones and assorted debris went back in the broth. Next came the belly rashers. The strips of skin were removed, with as little fat as possible, using the filleting knife I bought at the Lochinver chandlers in Sutherland in April. They went in the boiling broth. Next, all the bits of bone and cartilege were filleted out and also added to the broth. The meatI had bought a kilo of pork shoulder from the Arrow Farm shop, from which the rashers had also come back in Spring. This was now carefully trimmed and cut into roughly 1cm dice. Again, all the trimmings went in the gradually-reducing broth. The butcher had happily given me some pork bones and rinds (apparently they have the pay someone to take them away!), and these were also added to the pot. Boiling continued. The belly was cut up and minced twice, using the mincer attachment on our ancient Kenwood Chef, and then added to the diced shoulder. The result was 5¼ pounds of mixed meat. I had switched the digital scale to pounds and ounces at this point because I’d opted for the recipe for Warwickshire Pork Pie in one of the first cookery books Wife Number One and I bought together: The Constance Spry Cookery Book. This does contain a conversion table for something called ’grammes’, but all the recipes are in Imperial measures. The recipe is for 2lb of meat, so I scaled this up to 5¼lb using the method described in The calculator (and other electronic devices) in the kitchen. The recipe was very simple:
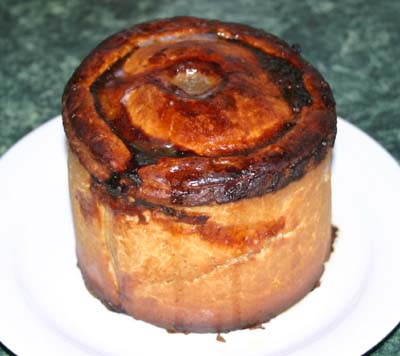
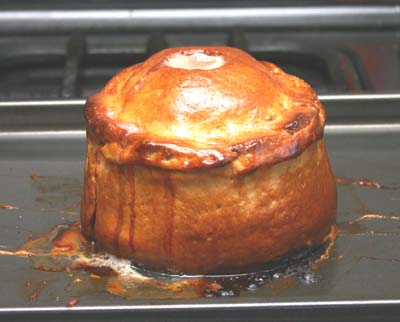
This was all kneaded together thoroughly and left to stand for a while. I then took a 4oz ball, flattened it slightly and fried it very slowly to test the seasoning. As pork pie is eaten cold, I then cooled and chilled the test piece before tasting. Meanwhile, the filling was split into four balls of about 1¼lb each. Three were bagged and frozen and the fourth kept in the fridge for the first pie. When I tasted the cold sample, I found it unacceptably salty and a bit short of pepper. I decided to get some more pork belly to dilute the salt and add extra pepper. I spotted some promising looking rashers in a butcher’s window when I visited Worksop market the following day and bought 4lb for a fiver on a special offer. They were much fattier than the ones from Arrow Farm, and much drier - reminiscent of the piece of Gloucester Old Spot pork we bought from the Welbeck Farm Shop shortly after it opened. I trimmed and minced these (adding the trimmings to the jelly pan, of course), and added six ounces to each of my four batches of meat. Meanwhile, back with the jelly...When I felt that everything useful had been extracted from the bones, rinds, trimmings and vegetables, I strained the broth into a big bowl through a colander. The debris filled a large supermarket carrier bag after wrapping in most of the Sunday papers. The stock was then strained through a fine sieve into a smaller pan and set to boil. I put a ramekin in the freezer in preparation for testing the jelly, just as you would with jam. After about four tries, I had a jelly of about the right consistency, so I put it in a two-pint pudding basin, which it filled, and chilled it. It was really firm when set. I ran a knife round the edge and released the jelly from the blow. It separated easily from the thick layer of white fat (well-seasoned lard), so I decided to keep this for the hot-water crust. The first pieWith the six ounces of extra pork belly I had 1lb 10oz of meat filling - near-enough to 2lb to stick to the Constance Spry recipe - so I decided to stay with the book for the hot-water crust. I sieved 2lb of plain flour and a pinch of salt into a big bowl and set 3 gills (3/4 pint) of water (yes, okay, I’ll metricate my recipe when it’s finalised) and half a pound of lard (the fat from the jelly made up with shop-bought lard) to heat in a saucepan. Meanwhile, I kneaded the meat with about a teaspoon of extra fresh-ground black pepper and formed it into a ball. When the water and lard mix was boiling I poured it into the flour, stirring briskly and then kneading it into a smooth paste. The consistency was perfect. I then rolled it out to about 1cm thick, cut a circle using a medium-sized plate as a guide, placed the meat on top and began to use my long-neglected skills as a potter to ’hand-raise’ the pie. This involved cupping my hands under the crust and gradually moulding it round the meat - difficult until it got past the halfway mark and began to support itself. A finger dipped in water was used to seal the inevitable creases. I then cut a roughly circular hole in the top and crimped a smaller circle on to form a lid, again using water as a ’glue’. The pie was then lifted carefully onto a square of baking parchment on a baking sheet. I decided to put the pie in the fridge to firm up the pastry before baking - I didn’t want it to melt and fall off the meat! After about an hour, I egg-washed the crust, cut out a neat half-inch circular hole in the top (to let the steam out and, eventually, the jelly in) and put the pie in the oven set at 160°C (ten degrees lower than the recipe recommended, because mine is a fan oven). After 90 minutes the pie was looking good, but a little pale. I gave it another fifteen minutes and then rescued it. A roasting thermometer pushed carefully into the centre showed the core temperature to be over 90°C, which worried me because my roasting thermometer shows 77°C for well-done beef and roast pork (an odd figure, but it’s a Fahrenheit thermometer and 170°F is 76.66666°C!). Then came the hard bit - the long wait for the pie to cool. After a while I could see a gap between the edge of the hole and the meat filling, so I started drizzling warmed jelly-stock in. It took a surprising amount for the first fill, and then every few minutes I was able to coax a little more in. The pie took ages to cool, but eventually the level of jelly seemed to be remaining constant and the crust was cool enough for the fridge. We were having supper with friends, and I’d hoped to take a sample of the pie round for a tasting. However, it didn;t seem cold enough by the time we left, so it stayed unmolested in the fridge until the following morning. Then I took a photograph...cut the pie, photographed the first slice and tasted it...
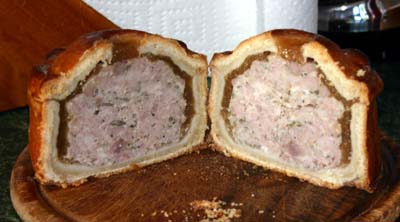
cut the pie, photographed the first slice and tasted it...
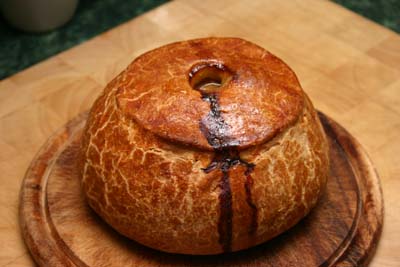
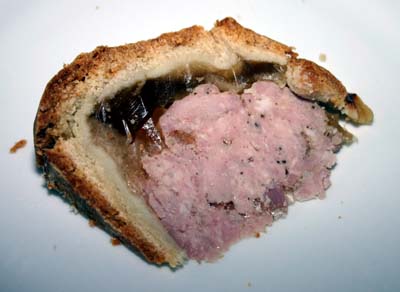
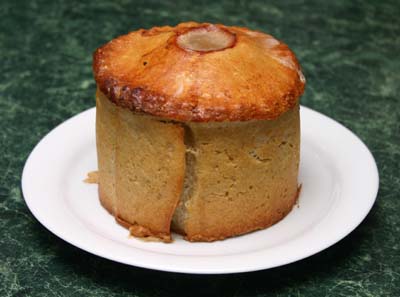
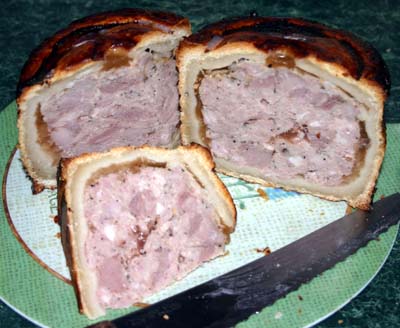
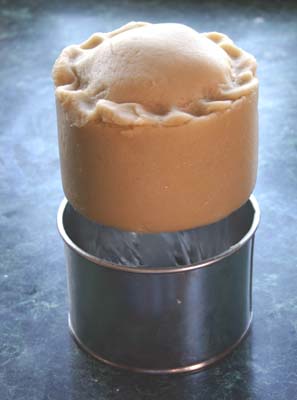
It was certainly no worse than any commercial pie I’d tasted recently, and better than most. However, I’d been right to worry about the final temperature: the filling was rather dense and dry. As can be seen from the second picture, the crisp brown layer of the pastry was rather thick, making cutting and biting a little too much effort. Maybe the pastry layer could be a bit thinner, too. The jelly was pretty good, though the pie had taken a bit too much because the overcooked meat had shrunk too much. I have to say the pie was also rather too big for everyday eating - I didn’t think we’d manage to finish it before it was past its best. Having said all that, it was cerainly a pretty good start. So... ImprovementsFirst, I think I’ll split the next batch of filling into two and make smaller pies. Hugh Fearnley-Whittingstall reckons a well-made pork pie will keep for a fortnight in ’a cool larder’ (as if anyone has one of those in 2008!), so making two at a time should be better than one bigger one. Second, I intend to increase the oven temperature by 10°C so the pies cook faster, which I hope will produce a thinner brown layer and softer pastry inside. Third, I will leave the roasting thermometer in one pie and check the core temperature sooner to catch it before it overcooks. Hugh Fearnley-Whittingstall gives 70°C for medium and 75°C for well-done pork, so I’ll go for medium. Having read various recipes, I’m wondering if I have the filling packed too tight. I also wonder whether mixing some of the set jelly, in small dice, into the filling might help to make the finished product moister. Another possible enhancement would be the addition of rendered bacon fat, of which I have an ample supply from Beedhams’ Beautiful Bacon: I might try working some of this into the filing. Talking of Beedhams, I made my second visit on the 25 January 2005. Johnny said I should give him a ring before my next batch of pork pie filling: he would save me some belly and shoulder from, his next bacon pig - fantastic! Finally, I might dilute the jelly a little... I have three more batches of filling in the freezer to experiment with. Plenty of chance to experiment, as I’ll be making more pies for a family party on the 2 February - some to eat and some to give to our four kids’ families. Update 1 February 2008A pretty frustrating day. I decided to make two pies from the same quantity of filling as for one last time. I tried warming the old left-over pastry, but it had got too brittle, so made some more. I seemed to have more trouble hand-raisinf it on the smaller pies, and I ended up with leaks. Some hours later I’m still trying to get the pies to hold a full load of jelly, hoping it will eventually seal the leaks as the pies get cooler. I added a small amount ot fat rendered from Beedhams’ bacon to the filling - it’ll be interesting to see how it affects the filling. I also started with half and hour at 170°C before dropping the oven to 160°C, but after another half-hour the core temperature had already got up to 85°C - need to check more often next time! Update 2 February 2008Loads of trouble with cracked pastry letting the liquid jelly out - it took me most of the day to get the jelly to seal the cracks enough to hold a complete fill, but we got there in the end after chilling the pies thoroughly. They were definitely better than the first effort, although I still think the meat was overcooked. Everyone else was impressed, though, and by the time all our family had filled their doggy-bags there wasn’t much left for us! I think the next lot will have to be raised in some kind of mould. I need a cylindrical shape of the right size - a 2lb Golden Syrup tin or equivalent, with the ends cut off, would be about right. Then I can line the mould with a rolled-out sheet, trim it off at the top and bottom, drop a bottom in and seal it thoroughly to the rest, then fill, add the top and crimp before somehow getting the mould off. We’ll see... Update 1 March 2008After a failed experiment in topping and tailing a syrup tin, I found a purpose-designed pork pie tin in the Nisbets catalogue (this professional catering supplier is happy to take small orders from private customers, and is where we’ve bought a huge amount of kitchen gear since we set up Partners in Your Kitchen many years ago). It’s 76mm (3in) deep x 114mm (4½in) in diameter, just the right size for the kind of pie Patricia and I can get through without chucking any away. It’s like a small loose-bottomed cake tin. Yesterday I gave it its first test run. Conveniently, it made two pies that each used one whole portion of my prepared and frozen filling (see above) and a batch of hot-water crust made with 1lb of flour - very tidy and no waste. I greased the tin liberally with lard, and rolled out my pastry while quite warm, and therefore soft and manageable. I marked out the main strip by rolling the tin over it and cut the strip a couple of centimetres wider and longer to allow for joints. I also used the tin to mark out a bottom and a top for the pie. Because the pastry was quite flabby it was a bit difficult to get the long strip wrapped tidily round the inside, and to fit the bottom disc in centrally, but I managed after a few dodgy moments. The disc was a bit oversize, giving a good overlap which I pressed firmly into place with my fingers - easy for someone who’s taught many kids to make pinchpots in pottery classes. The overlap in the long strip was also pressed firmly together. The aim was to get the pastry of even thickness and push any surplus to the top, and this seemed to happen okay. I put the meat mixture in in small chunks, dropping them in and only pressing them down quite gently because I didn’t want to push any through the pastry - and, anyway, I was hoping for a slightly open texture where the jelly would leak into any voids. I shaped the top of the meat to a dome and fastened the lid on with eggwash, crimping the edge with a fork for a decorative finish. Finally, I used the end of a turkey baster to drill a circular hole in the lid to let the steam out and the jelly in. The pie went in the oven at 170°C for 15 minutes, and then the temperature was reduced to 150°C. I checked the core temperature with a digital thermometer at 15-minute and later 10-minute intervals, and as soon as it had passed 70°C (by a surprising margin, actually!) I rescued the pie from the oven. It hadn’t stuck to the tin at all, so I stood it on a whisky-glass and slid the tin off. I was very disappointed with the colour: while the top had browned nicely, the part inside the tin looked very pallid. So I allowed the pie to cool quite a lot, then eggwashed the crust and put it back in the over at 230°C until it had taken on a bit of colour. Here’s the result:
The nasty gash down the side is where the ends of the pastry strip were overlapped and joined. Obviously I should have eggwashed the joints. Once the pie had cooled a little, I started putting the jelly in with the turkey baster. This time I used the stock from the bones of four chicken legs we’d eated a while before, enhanced by boiling the rinds from a few rashers of Beedhams’ beautiful smoked bacon in it for half an hour. As always, getting the jelly in was a long job, requiring pauses between frequent top-ups. Meanwhile I made the second pie, this time giving the joints a liberal brushing of eggwash and relying on the lard to stop this sticking to the tin. This one was baked differently: started in an oven heated to 230°C; as soon as the thermostat light went out, the control was turned down to 150°C and the oven was allowed to cool gradually to this temperature. I was hoping that this would give the outside of the pastry a real blast and that it would brown better inside the tin. It didn’t - just as pallid as the first. The pies were fridged overnight, and this morning I gave the first one a tiny top-up of jelly and put the second, in a bag with all the air sucked out, in the freezer. This is very much an experiment. The plan is to bring it out, let the outside surface warm a little, eggwash it and give it a serious blast in the oven while the inside is still frozen - could be a catastrophe (particularly as I put the jelly in this one too before freezing it!), or it could solve the browning problem. This lunchtime we sampled the first pie.
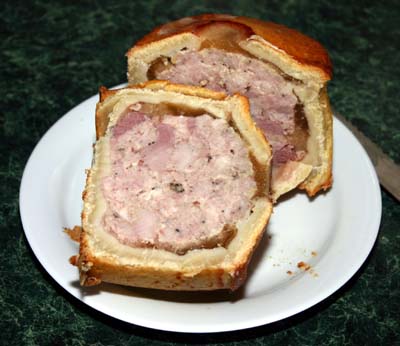
Not an airspace to be seen, with much softer, moister meat and a very good flavour. With a smaller pie and shorter cooking, there had been less shrinkage and there was therefore less space for jelly - but enough. Certainly as good as any pork pie I’ve bought from a shop recently, and far better than most. Unfortunately the pastry had a tendency to de-laminate, as you can see, the crisp outer crust coming away from the softer inner part - possibly from its second visit to the oven. Update - 10 March 2008This morning I took the second pie out of the freezer, brushed it liberally with milk and put it in the oven at 230°C, set the timer for ten minutes and sat down with my book to wait. So far so good. After a while, I began to wonder if more than ten minutes had passed, and - checking the timer - realised that I hadn’t pressed the start-button. I rescued the pie: it was a little more tanned than I’d intended - certainly pretty rustic-looking! I boiled up my stock of jelly in the microwave and began a succession of top-ups, tapping the sides to coax the air-bubbles to the top. The pie had been full of jelly when it went in the oven, but quite a lot had boiled over during its over-long baking. When it was cool I put it in the fridge and waited until it was really cold before topping up again...and again...and again. At last all the air-bubbles seemed to be out, so I left it until lunchtime.
Then the critical moment - the cutting. The pastry seemed more stable than before - no sign of de-lamination. And, unsurprisingly, it was very crisp.
There was far less visible jelly, but - unlike in most shop-bought pies these days - there were no visible air spaces. The crust was wonderfully crisp and tasty - by far the best effort so far. I think I need to get better-quality meat next time. The mix of minced belly and diced shoulder seems to work well, but I need to chop the shoulder a bit more finely next time. The jelly was cold, moist and well seasoned, but the meat could do with a little more flavouring: it seems to absorb masses of black pepper! For the next trial, I intend to try getting the pie out of the tin before it’s baked. If this works, I’ll be able to freeze as many uncooked pies as I want and just cook them and add jelly as required. That will require a fresh batch of meat, though, as I don’t want to freeze it, thaw it and re-freeze it uncooked. Having said that, this last pie did very well lightly baked, frozen and then re-baked. Of course, if I did that deliberately - rather than on the spur of the moment - I wouldn’t put the jelly in until after the second baking. Update - 9 June 2008Today I took another defrosted batch of pie filling and added one bayleaf and quite a lot of fresh sage leaves from the garden, finely chopped, together with 10 twists of the pepper mill and and good pinch of extra salt. I then ran a sharp chopping knife through the meat in small batches to reduce the sizes of the pieces of lean shoulder a little. The mixture was then kneaded thoroughly to mix it and split into two roughly equal balls. These were weighed and adjusted slightly to produce two equal balls, each weighing 375g. Having got so far in metric units, I decided to metricate Constance Spry’s recipe for hot-water crust:
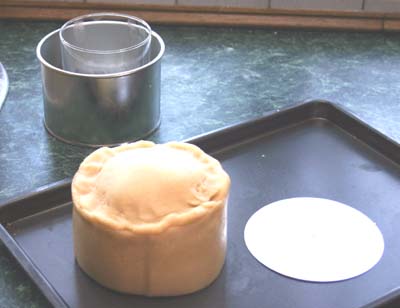
The process was exactly as before (apart from larding the tin more generously) until a crucial point, when I attempted to release the uncooked pie from the tin. After forming the first pie, I put the tin on top of a whisky glass and tentatively tried to slide the tin downwards. To my delight, it slid off the pie very easily. Step one, then, was a success!
I thought the next stage would be rather more of a problem. I put the pie, still attached to the removable base of the tin, on a baking sheet and attempted to slide it off, using my whole hand carefully curved around the pie to spread the load. To my surprise, it slid off, but not - because of lack of anticipation, into the middle of the baking sheet (as if that really mattered).
For the second pie, I re-larded the tin thoroughly. This time I cut the long strip of dough a couple of centimetres wider to allow the top to be attached more elegantly (I’d forgotten this trick from previous attempts). Once the bottom had been centered (very difficult) and pressed iinto place, using the ’thumb-pot’ technicque mentioned earlier, I let the surplus sag over the edges while I put in the filling. Then I trimmed it using the knife vertically, so that a lip of pastry was left all round. The lid was then laid on top, pressed gently down round the dome of filling and finally crimped to seal it with fingers and thumbs. The result was much neater. This time I tried larding the baking sheet to allow the pie to slide. It didn’t - and the base of the tin stuck to it like glue! Best to leave the non-stick surface uncontaminated... So - one tin, two pies! One for the oven and one for the freezer.
When both pies were finished, there was 700g of dough left. I have found that, if warmed gently in the microwave, frozen and defrosted hot-water crust can be re-used, so no problem. However, this was almost half the original 1550g of pastry, so by rolling the crust a little thinner I could get four pies out of a batch. And since I now have a method for producing more than one pie at a time and freezing uncooked ones, I’m on the way to mass production. This mean it will be worthwhile asking Johnny Pusztai for several kilos of belly and shoulder from one of his bacon pigs (as he suggested when he tasted one of the last batch - see Improvements above) The first (scruffier) pie was baked for 20 minutes and then another 10 minutes at 230°C, at the end of which it was taken out for a coat of eggwash. The centre was at 43°C. However, the inadequately crimped top had partially detached itself from the sides! A hasty patch-up job with spare dough and eggwash, and it went back in the over for another 10 minutes. Another check, another 15 minutes (64°C) and another five minutes to get past 70°C. It seems that once the meat had released a lot of liquid it heats up very quickly. The re-sealing of the lid had worked fine, but there was some leakage - maybe from the vertical seam or the join between the bottom and the sides - so the pie was left to cool undisturbed in the hope that it would re-seal itself. The colour was superb.
Meanwhile, the tidier pie was put in the fridge on its baking sheet, and when it was firm enough to hand it was released carefully with a large scraper. The joint between the sides and the bottom - on the outside at least - looked a bit questionable, so it was carefully worked over to seal it using those old pottery skills again. Once cold, the dough has a very similar consistence to a smooth clay body. The vertical joint was also smoothed over. The the pie was bagged, the air was sucked out (using the turkey baster and good old lung power, the bag was sealed and the package was consigned to the freezer. At the same time I checked and found, to my great pleasure, that I had just used the last of the four batches of filling. Next stop, JT Beedham & Sons! As soon as the outside of the pastry felt cold, I started adding jelly (home-made chicken stock seasoned with Marigold bouillon poweder and salt) through the hole in the pie lid. Everything was fine until I started the third fill of the turkey baster: then the vertical join in the pie wall started leaking from fairly high up. I tipped what I could back into the stock pan and put the pie back in the fridge. Previous experience told me that each leak through well-chilled pastry would block a little more of the opening. My theory is that the jelly should be added when quite warm so that it is as liquid as possible, allowing it to penetrate small gaps in the meat filling, but with a leak it’s a fine balance: cooler, thicker stock won’t get through small gaps as easily and will set more quickly to bung them up. After half an hour I added some more jelly, but again after getting some more to stay in the vertical joint started leaking again. The lesson here is that the clay-like character of the raw pastry must be exploited to close up any leaks before the pie is baked. For the present pie, though, I needed something to plug the leak from the outside... The answer occurred to me while waiting for the pie to cool some more: lard. And it worked beautifully with cool jelly stock. I’ll be able to scrape off the surplus when the jelly has set and achieve the ideal: a pie in which every tiny gap is filled with jelly.
Job done! Not an air-gap in sight. The proof of the pie is in the eating, and here’s the verdict... The crust was crisp on the outside and soft inside, with a very good flavour from the caramelisation, but perhaps a little hard and a bit thick. The chicken jelly was rather flabby and not very tasty, despite careful tasting and adjustment of the seasoning. And the filling was, to my taste, too firm and too dry - particularly the diced shoulder pieces. As I have another pie in the freezer I can’t do anything about the thickness of the pastry in the next test, though it may be a little thinner - or thicker. The jelly is wide open, as this is added after baking - maybe I’ll buy a slab of belly with bones in and rind on, and - as before - add some bacon rind to the stock.. And, while the composition of the filling is fixed for this one pie, the baking temperature is available for modification. Our vast collection of cookery books doesn’t offer many traditional pork pie recipes. I can’t say I’m surprised: getting this right is proving difficult - maybe hard enough to put the average home cook off the whole idea! Hugh Fearnley-Whittingstall’s River Cottage Meat Book has a recipe using hot-water crust but baked in a tin, and gives a starting temperature of 180°C, dropping to 160°C after half an hour - a lot lower than my 230°C. The Constance Spry Cookery Book gives ’a moderate to slow oven’ for a proper hand-raised pie baked without a tin. Slow is shown as 280-320°F and moderate as 340-370°F, which translates to a range from 137°C to 187°C - quite a range! The great Jane Grigson, in Charcuterie and French Pork Cookery, gives a raised pork pie baked in a mould at 300-320°F (149-160°C). So HF-W’s temperatures seem reasonable. And for me, the timing of the low-temperature stage will always be with a thermometer - maybe dropping 70°C from my 230°C will slow the rise so that I can actually catch it at a core temperature of 70°C (maybe a little lower to allow for cooking continuing after the pie is out of the oven). If the pastry isn’t browned to my taste I can always pop the pie back in a very hot oven briefly when it has cooled a little. For the future, I’ll cut the shoulder pork into smaller pieces - and maybe try mixing some diced jelly with the meat Update - 23 June 2008The frozen raw pie was taken out of the freezer yesterday and defrosted overnight, still sealed in its bag. This morning, a new batch of chicken stock was put on to boils, as a basis for the jelly. The joins in the pastry were carefully worked over with a palette-knife to try and ensure a good seal all round, and the pie was brushed over with whole milk and put in the oven at 180°C. After 30 minutes, with no visible browning, the temperature-setting was dropped to 150°C (HF-W’s 20-degree drop seems a bit conservative) and the timer was set for a further 30 minutes. Checking after 20 minutes I found that the whole top had lifted off the pie - calamity! The core temperature was only just under 50°C but liquid was visible in the vent hole, suggesting that it would climb quite quickly from here on. I put the pie back in the oven for the remaining ten minutes while pondering how to seal it! At the end of this time the core temperature was 66°C, so the pie went back in for five more minutes. What was weird was that the vent hole was full of liquid but nothing had leaked out lower down, where the lid had lifted! Browning was still far from satisfactory. After five minutes the core temperature was up to 72°C, still with no leakage but with some overflow from the vent hole. The pie was left to cool. Then I defrosted a bit of the leftover dough, kneaded in a little water and rolled out a ’sausage’ about 5mm in diameter. This was moistened and left to stand for a couple of minutes and then pressed firmly onto the top of the pie-case. The lid was then pushed down quite hard, the overflow of dough was smoothed off and the pie left until the oven had reheated to 230°C for a fast browing and too cook the extra raw dough. The pie was brished with milk again and placed in the oven. More coming... |
Personal site for Paul Marsden: frustrated writer; experimental cook and all-round foodie; amateur wine-importer; former copywriter and press-officer; former teacher, teacher-trainer, educational software developer and documenter; still a professional web-developer but mostly retired. This site was transferred in June 2005 to the Sites4Doctors Site Management System, and has been developed and maintained there ever since. 
|
|