

You are here: Home
|
|
|
You are here: Home |
The Sourdough Project14 March 2011 Was it really 2007 when this project ground to a standstill? It must have been because this page just fizzles out with nothing to report after the 8 August of that year. I’m ashamed that I didn’t at least record the last phase of breadmaking before injuries and other pressures put a stop to my investigations, and apologise to anyone who was following this page. Anyway, yesterday I attended a one-day course entitled Wild Yeast Baking at The School of Artisan Food on the Welbeck estate near Worksop (Nottinghamshire, UK). As a former trainer myself, I was incredibly impressed that 13 people all managed to produce two white baguettes, a dark rye loaf and a three-flour Levain de Campagne on a course starting at 10am and all walked out on the dot of 5:30pm. My levain loaf was beautiful to look at, of a very high technical quality - and delicious. You can read about my subsequent adventures, failures and successes in the Sourdough bread 2011 page... The old storyI had been intrigued by the idea of baking sourdough bread for a while, mainly because it seems a more natural approach than using commercial yeast developed from beer brewing but also because Patricia often complained that my bread tasted ’too yeasty’ - something a lot of people seem to like. I did some research on the web and then did two things. I bought over Ebay a Genuine San Francisco Sourdough Starter from a charming lady called Linda C Wilbourne in Benbrook, Texas for $8.99 plus $1 postage. You can see masses of stuff about breadmaking on Linda’s website at http://www.sourdoughbreads.com/. And you can find out about the San Francisco Starter at http://www.sourdo.com/culture.htm. At the same time I started a genuine ’Worksop Sourdough Starter’ using instructions from S John Ross - see this at http://www.io.com/~sjohn/sour.htm. This involved mixing a cup of Tuxford Mill flour with a cup of Worksop tap water (the best-drinking tap water I’ve tasted since leaving West Middlesex in 1964) in a Kilner jar and putting it in our very warm utility room. This was be fed every 24 hours by throwing away half and mixing in another cup each of water and flour. This failed, but if you’re interested you can read about (and see pictures) it in The Sourdough that Never Was. Why sourdough?For the best of possible reasons: it’s said to taste a helluva lot better than ’ordinary’ bread - even home-made. More philosophically, it’s truly natural bread, fermented with micro-organisms native to the flour used and/or to a real environment - even if, in the case of me using the San Francisco Starter, that environment is on the other side of the world. All my bread to date has been fermented with Allinson’s Dried Yeast, which is a presumably-pure strain of brewer’s yeast, which has a very powerful smell belonging in beer rather than bread. Did you know that the Whitbread brewery in the centre of London used to have a huge silver bowl on a table in its reception area containing active yeast skimmed from the current brew, from which local residents could help themselves when making bread? I don’t know if it still does... Sourdough bread is raised partly by yeast, just like ’ordinary’ bread, but it relies on native wild yeasts. The rest of the rising, and the characteristic sourness, comes from bacteria related to those that produce yogurt and creme fraiche (and therefore ’Good Bacteria’ as advertised so vigorously on TV!), producing lactica nd acetic acids. Unlike conventional yeast, a sourdough starter is a colony of two or more micro-organisms living in harmony (or symbiosis, as biologists call the relationship). ’United we stand, divided we fall’ seems like a good motto, because apparently the San Francisco Starter, consisting of just one yeast and one bacterium, has been fighting off invaders succesfully for a century or more! A great deal of research has been done on this famous starter, with the result that the exact strains of yeast and bacterium have been identified. Normal baker’s/brewer’s yeast is Saccharomyces Cerevisiae. The strain in the San Francisco Starter has been classified most recently as Candida Humilis, a fungus that belongs to the same family as the one that produces the Thrush infection! The bacterial member of the partnership is called Lactobacillus (like the yogurt culture) Sanfrancisco. I was very much looking forward to comparing the results from my two starters. Obviously, with its track record, I expected the San Francisco bread to be infinitely superior, but maybe our local town of Worksop - or even our own village of Carlton-in-Lindrick - would become equally famous as the birthplace of a completely new and superior family of sourdough breads. The Worksop Sourdough Starter was an interesting experiment, but it died before it got to the bread-making stage. I’ve therefore moved the detail onto a separate page. What follows is my ongoing diary of work with the San Francisco starter, which is still very much alive and is filling our freezer with all kinds of bread. The San Francisco Sourdough Starter15 January 2007 Linda’s package - cost $8.99+$1 postage, which came in at £5.31 - arrived today. It consists of a well-written 11-page instruction book and a little bag of dried starter. The instructions are comprehensive and detailed, and can be read on her website at http://www.sourdoughbreads.com/SourdoughStarterHelp.htm). Temperatures are, of course, in Fahrenheit, weights are in pounds and bulk measures are in cups. A US cup is 8 fluid ounces - except that even a US fluid ounce is different from an Imperial one, making a cup 237ml. 8 Imperial ounces or 250ml should be close enough for the starter. For my own benefit, I’ve ’translated’ and summarised Linda’s instructions.
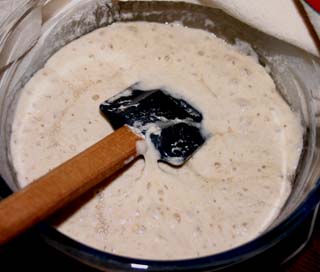
17 January 2007 On reflection, I think I should have time to do this before we go to The Fat Duck - 6 days is double the 72-hour minimum - so I’m going to try and have a fridged starter before we go. Might even get a batch of bread made... 12:30 Stages 1-3 completed. Monitor 16:30, 20:30 and bedtime. 18 January 2007 18:30 This morning nothing was happening, except that the mixture had separated into a layer of flour and a layer of water, like the previous starter. I therefore decided to feed the ’beast’ with ordinary ’soft’ plain flour, on the basis that it’s higher in starch and lower in protein than the strong bread flour. I did this first-thing this morning and again around lunchtime. We went out, returning about 15:00 to find the mixture transformed: so much increase in bulk that I decided to tranfer it to a bigger bowl at the next feed, and lots of large bubbles. On stirring this evening, I found the consistency very ’glutenous’, as Linda describes it. I have now repeated what always seems a dirty deed, tipping the bulk down the sink to leave one cupful and then adding a cup of soft flour and a cup of tepid water. Fermentation looks very vigorous, so I think we’re on the way. Obviously the Tuxford Mill stonrground flour, though it makes good bread, isn’t the best for the starter phase. As yet, no distinctive sourdough smell, but we’re not yet halfway through the 72-hour activation. All this success despite a 3-hour 30-minute power-cut this afternoon, thanks to the storms that are sweeping across the UK. Hooray for global warming! 19 January 2007 14:00 Nice and lively this morning, fed about 8:30 and photographed just now before the next feed - thick, creamy (with no sign of separate liquid on top) and full of bubbles:
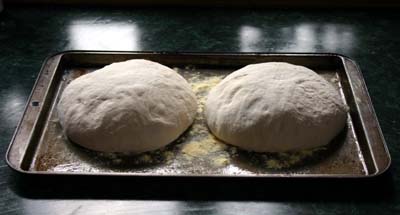
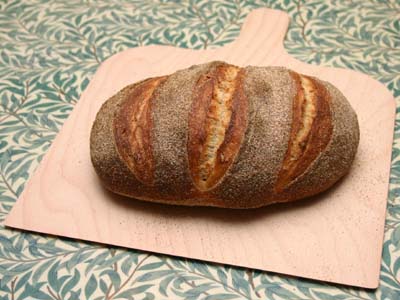
21 January 2007 15:30 The starter has developed a definite slightly sour - but very pleasant - aroma over the last couple of days, so it looks as if Candida Humilis and Lactobacillus Sanfrancisco have been joined in happy symbiosis. Importantly, there is no yeasty smell, like the one I get with commercial yeast. Following the lunchtime feed yesterday I waited about 90 minutes until the starter was looking vigorously active, then transferred it to a clean Kilner jar and put in the the door of the fridge, with the lid unsealed. I sealed it at bedtime. This morning the level in the jar was quite a bit higher than when I’d filled it, and when I opened the lid there was a ’shush’ of escaping gas - both indicating that fermentation had continued. It still looks lively, and very clean and healthy, so I guess activity is continuing - but at a much slower rate.. Linda’s instructions say it can now be left in the fridge for a month, during which time the micro-organisms should hibernate. After that time it should be brought out, fed, allowed to come back to room temperature and kept out until activity is well established. It can then be returned to the fridge for another month. My starter won’t be left that long, because I can’t wait to make some bread! So later this week I will wake it up, feed it, take out one cup when iot becomes fully active for the bread and another cup for my ’stash’, getting it sully active before returning it to the fridge. Then the real fun will begin. First, though, we have a date with Heston Blumenthal’s tasting menu - see a sample (and some scary prices) here... 22 January 2007 12:00 The starter in the fridge has calmed down now - whether from starvation or from cold remains to be seen! 25 January 2007 18:00 Back from The Fat Duck, and time to make some bread. I took the chilled starter out of the fridge this morning at around 09:00 and put one cupful in a bowl. This was fed with 1½ cups of flour and 1½ cups of water. This - the ’active starter’ for the bread - was left in the kitchen at a slightly lower temperature than that in the utility room, because slower fermentation should produce tastier bread. The remaining starter in the jar was fed with half a cup each of flour and water, allowed to become active and replaced in the fridge. This evening, after fermenting vigorously, the active starter was beginning to subside, so I have just fed it with another cup each of water and (this time) Tuxford Windmill bread flour. It will get another feed of 2½ cups of each at bedtime and this should produce the active sponge for breadmaking. There is an option to feed it again in the morning and wait half an hour before starting. The sour smell is now quite a bit stronger, but still very wholesome! 26 January 2007 09:00 I left the bowl at the cool end of the kitchen last night, but this morning it still looked as if it had fermented and then slowed down, so I gave it a cup each of flour and water before breakfast and moved it away from the window. It soon returned to its usual creamy, bubbly self. Incidentally, since I started adding strong flour I’ve been watching anxiously for separation of flour and liquid, but this doesn;t seem to have happened. So we’re finally ready to make bread! Just a quick calculation: 250ml starter = 125ml water and 125ml flour; add 375ml of each = 500ml of each; 125ml of each = 625ml of each; 625ml of each = 1250ml of each; 250ml of each = 1500ml of each in total. My current recipe uses 700ml of water to 1kg of flour, and today’s sponge contains 1500ml of water, so the total amount of flour needed for a wet dough is 1000 x 1250/700 = 1785 grams. I only have 1500 grams of flour, and I haven’t weighed a cup of flour. Still, assuming it’s about half the density of water there could be as much of 750 grams already in, so that should be okay. Here goes, then... 11:50 It must have been about 10:00am when I actually got started. Linda says to work with 2½ cups of sponge, but I decided to split my sponge in half by weight. I added the flour a bit at a time, stirring, until the dough was about right for Richard Bertinet’s French kneading method (lift-slap-fold), but it was actually a lot stickier than my usual yeast-based dough (presumably because of all the flour that had been modified in the starter and the sponge) and I had a sweaty fifteen minutes kneading. I worked a little more flour in at the end, and then coated the dough in flour before putting it in the bowl, rather than oiling it as in Linda’s recipe, because that’s what I usually do, and covering it with a cloth. I’ve left it at the cool end of the kitchen to rise slowly. So far it is slow. We’ll see... The other half of the sponge was looking a bit quiet, so I’ve just stirred in a small amount of flour to keep it going. I’ve also just realised that I forgot to salt the first batch, so I’ll have to try and fold some in at the knocking-back stage. Fool! 13:25 Just inspected the dough. It has increased considerably in size, though I can never judge the magic ’doubled’ thing for a big round blob! 14:15 The dough looked quite well risen, and when scraping it out of the bowl the texture was quite open, so I have sprinkled a tablespoon of fine sea salt over it while knocking back and then kneaded lightly to distribute it and to work just enough flour in to make it manageable. It’s very soft, and may make quite flat loaves. Never mind! It’s resting under a tea-towel for half an hour prior to shaping, and the oven is already on full (nominally 230°C but I’ll check with the thermometer) so that the metal will all be hot, too. Must get/make a baking stone, and I had the idea that a couple of bricks in the bottom of the oven would make a good heat-store... 15:10 The dough was divided into two equal pieces with my plastic bowl-scraper and, with the aid of some flour because it was still very soft and sticky, shaped into two simple round loaves, using the ’rounding technique of repeatedly pulling the edges into the middle of the underside. This is said to improve the structure of the loaf, as well as providing a sort of skin on the outside. They were then placed on a baking tin which had been brushed with olive oil and sprinkled with fine polenta (the nearest I’ve got to Linda’s coarse cornmeal).
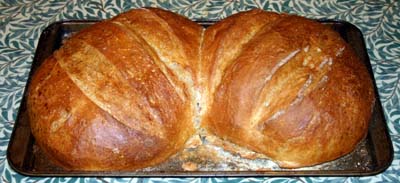
They are currently under a loosely-tented tea-towel next to the cooker, with the oven set to 230°C, at an ambient temperature of just over 23°C. They are already touching: whether this is due to rising or the soft dough slowly collapsing remains to be seen! The final proving should take around two hours at this temperature. 17:20 Two deep slashes were made across each loaf and the raised area eggwashed (one egg, one tablespoon water, whisked). Boiling water had already been poured into a roasting tin in the bottom of the fan oven, which a thermometer showed to be at 230°C (25°C hotter than Linda’s recommended 400°F). The loaves were put in the middle of the oven and water was sprayed over the sides and back of the oven. This was repeated after a couple of minutes and again after five more minutes, when the bread had risen enough to open the slashes. After ten minutes the temperature setting was reduced to 190°C as instructed in Linda’s recipe. This surprises me, because as noted on the Home baked bread page I feel that bread should ideally be baked at a higher temperature than my oven can reach. After 30 minutes the loaves were beautifully brown. I checked the temperature inside with my digital probe and it was well up in the high nineties Celsius, but as tapping the bottoms didn’t produce a really hollow sound I decided to give them a few more minutes.
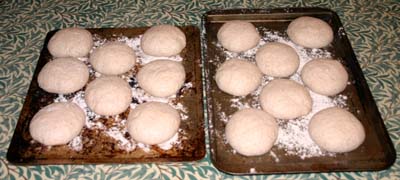
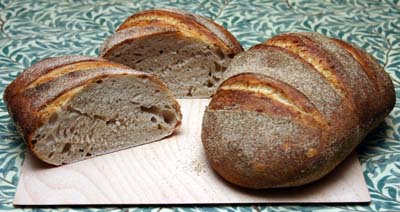
The loaves showed the classic sign of having been shaped from dough that was too soft: no rounding at the bottom and a sharp edge all round. Also notable that the fine cornmeal seemed to have disappeared - must get some coarse. Semolina should be good, too. Interesting that the surface in the slashes, which was not eggwashed, has browned just as much as the rest, which was. Linda’s recommendation to eggwash is based on the statement that sourdough is notoriously difficult to brown. Could this be because my loaves got their first ten minutes in a much hotter oven than Linda uses? At dinner time, Patricia had made Cullen Skink, her wonderful smoked-haddock and potato soup. The bread went down wonderfully with that - and with butter and our French friend Annick’s home-made blackberry jelly and apple jelly. The texture was unusually open for one of my home-made breads, as can be seen from the photograph above, and the bread was pleasantly soft and light. The distinct sourdough taste about which I’d read so much was quite subtle.Perhaps it will increase as the starter matures... This left me with half the original sponge. I suppose Linda expects me to discard this, but - ever eager to experiment (and a war-baby brought up never to waste anything - I decided to give it small feeds (roughly a couple of tablespoons) of flour (no water) at regular intervals. It was still looking happy at bedtime. 27 January 2007 12:30 This morning, we tried the bread as toast, with my 2004 Seville orange marmalade and our favourite French honey (see the French Shopping List). Wonderful! My stepson Alistair (who is an enthusiastic beginner at breadmaking) had a slice, and was noisily enthusiastic. The sponge still looked happy this morning, so I decided to make some rolls using spelt flour. I stirred in about a cup of strong white flour and left the sponge for three hours, by which time it was thick, creamy and very bubbly. In effect, this process over two days was the beginning of dough-making. I completed this by adding the end of a bag of Dove Farms organic spelt flour with a good handful of fine sea salt and stirring this in. I then continued with the beginning of a bag of Caudwell’s Mill spelt flour until the dough was firmer than yesterday’s but still soft enough for the ’French knead’. This is now lightly coated with spelt flour in a large bowl under a damp tea towel. Fingers crossed... After a couple of hours at around 21°C the dough was ready for shaping into 16 carefully rounded balls. These were placed on oiled and floured baking sheets.
After a couple of hours more, I decided that they had risen as much as they were going to - not as much as rolls made with white flour, but enough.
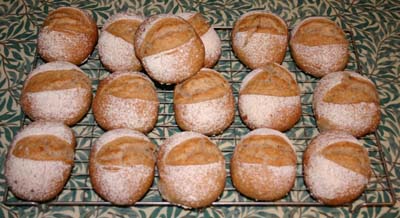
The rolls were sprinkled with spelt flour using a nylon tea strainer and slashed quite deeply using the wonderful ham knife I inherited from my Dad, freshly sharpened with my Chantry sharpener.
They were baked in an oven (with a tin of water in the bottom and several water-sprays early on) at 230°C, reducing to 190°C after about ten minutes, for 25 minutes. As with yesterdays loaves, it is obvious that rising has continued in the oven from the way the slashes have opened. This has not always been the case with my other breads - sometimes they actually shrink when the heat hits them.
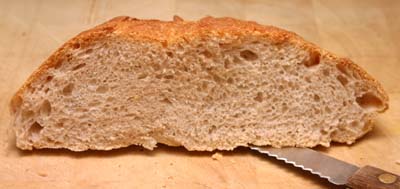
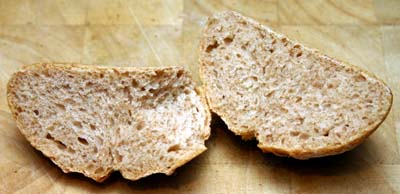
The final picture shows the first sample tested - cut in half and with a bite taken out! The crumb is firm, the texture surprisingly open and the taste very good indeed.
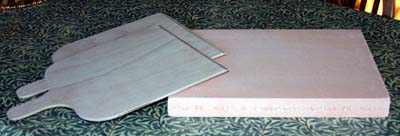
The verdict? A huge leap forward for me, producing excellent bread without the beer-yeasty taste that has always put Patricia off - though she’s usually been too polite to say so. And, as this second batch shows - having used the day-old left-over sponge instead of discarding it, with a more demanding flour - I have ample scope for experiment. Many many thanks to Linda Wilbourne for the very reasonably-priced starter, all the way from Texas, and for the comprehensive information, which has got me going confidently and with the minimum of stress. My remaining starter is safely stashed in the fridge door, ready for the next batch of bread. I hope this page will encourage many others to start off down the sourdough route and bring Linda many new customers. 30 January 2007 Today I found and ordered a fireclay bread-baking stone. This will be a good fit on one of our oven-shelves, and as it is 40mm thick it will absorb a great deal of heat. Loaves and pizzas can be baked directly on the stone, which is supplied with a peel (the traditional wooden baker’s shovel). Rolls will be baked on an aluminium baking sheet which will lie flat on the stone. This will have two effects. First, it will provide a very hot, absorbent surface backed by the stone’s huge heat capacity so that it will not lose temperature significantly when bread is placed on it. Second, it will provide a substantial reservoir of heat so that the oven should recover temperature very quickly after the door has been opened. The supplier is The House of the Pizza Stone in Hanover, Germany. The stones can be bought online and over Ebay, using the Paypal instant payment system. 2 February 2007 The cut half of the white loaf shown in the photo above those was frozen on the 26 January (in a freezer bag with all the air sucked out) and defrosted again on the 31 January to be photographed and eaten. The left-over part was wrapped in clingfilm and left for two days in the warm kitchen, and this lunchtime it was popped in the oven at 180°C for four minutes. If anything, the crust was improved - much crisper and not so leathery to cut, and the inside was brilliant. When the first slice was cut off, the crumb was light, moist but firm (it recovered fully when squeezed between finger and thumb). The taste was excellent - so much so that I even ate the first slice, buttering the side that had dried in the oven. My feelings about this project get better and better. This is already the best bread I have ever made, and in sourdough terms I’m a complete greenhorn (forgive a cowboy term, Linda!). I just can’t wait to get the next batch of bread on (when the stone arrives). And I can’t wait to have a go at sourdough pizza, just because I want to and because of what I say on the background page for the dinner at The Fat Duck. I found a description of a kneading technique that’s specific to pizza in Blumenthal’s In Search of Perfection... Changing the subject, our new digital scale arrived today:a My Weigh 7001DX bought overnight from Scales-R-Us. I know the latest breads have been created by inspired guesswork and ’feel’, but there are times when you need precision and repeatability. This scale is smaller than the one we used to have, yet it can weigh up to 7kg! 6 February 2007 13:00 About an hour ago I repeated the starter-revival routine, taking the jar out of the fridge, stirring thoroughly because the flour had settled leaving a layer of clear-ish liquid about 1cm deep, and then pouring one cupful into a bowl. Half a cup each of plain flour (not strong flour) and water were stirred in and the jar was left to warm up. One and a half cups each of plain flour and water were added to the bowl and stirred in; this was covered with clingfilm and a small hole cut in the centre. Both are now looking quite bubbly. The plan is to make bread tomorrow morning after visiting Worksop market for fish. I hope that the baking stone will have arrived by the time the first batch is ready for the oven. 14:00 The starter in the jar looked good, so I returned it to the fridge with the lid unsealed. 14:25 I’m a great believer in Murphy’s/Finagle’s/Sod’s Law, so I was sure that by starting the next batch of bread I’d ensured that the stone wouldn’t arrive in time. Oh me of little faith... Somebody up there must like me, because the baking stone and two wooden peels arrived less than five minutes after I wrote the last entry!
To my great relief, the stone - which is brutally heavy and should therefore absorb a huge amount of heat - fits perfectly on one of our rather flimsy oven shelves.
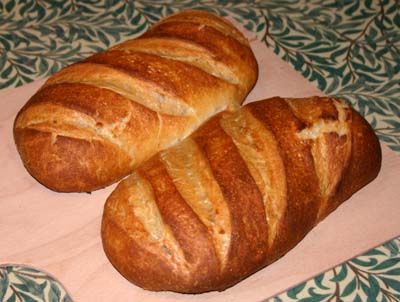
By tomorrow evening the first test will have been done. I can’t wait to slide my first loaves, lubricated with Tuxford Windmill semolina, off the peel onto the stone. 19:30 The active starter was looking a bit lifeless, so I’ve just added one cup each of Tuxford Windmill strong flour and one of water. At bedtime it will get 2½ cups of each to help it make it through the night. 7 February 2007 12:10 2½ cups each of strong flour and water were stirred in at 11:00pm last night, and another cup of each at 8:00am this morning. At 11:00am I used the beautiful new digital scale to split the sponge into two equal portions of 1080 grams. The spare batch was fed with half a cup of flour and covered. Three cups of strong flour were each stirred into the working batch, and a further half cup mixed with 1½ tablespoons of fine sea salt was stirred in. At this point the dough was very wet and sticky, but firm enough to turn out onto the worktop. 25 grams of flour were kneaded in, and then a further 25 grams to produce a dough just manageable enough for French kneading. It was kneaded for 15 minutes, placed in a floured bowl and covered with a damp0 tea-towel. The timer was set for 90 minutes. French kneading is the method outlined on the Home Baked Bread page, which allows dough much wetter than normal - wet enough to stick pretty firmoy to the worktop! - to be worked effectively. You tear the dough off the surface and swing it up away from you, slapping it down hard. Then pick up the end furthest from you and repeat. When the dough is about twice as long as it is wide, you fold the nearer end over onto the further end. Repeat, rotating through 90 degrees each time. I find that you need to swing-and-slap three times between folds to begin with and later only twice - though this has to be judged by the behaviour of the dough. I just hope that this time I have the dough firm enough for the loaves to keep their shape... 17:20 The kitchen was very cold today as I was working in the garden and kept leaving the door open. Then I got stuck watching something on TV, so I didn’t knock back and shape the loaves until nearly 5:00pm - the dough still feeling really cold. I*’ve put one on each peel on a thick sprinkling ofwhole-grain organic semolina from Tuxford Windmill. I’ll dust the loaves with this and slash them before baking. I’ll have to bake them separately as there’s no way of getting two on one peel and no way of getting two loaves from a peel onto the stone! 20:45 Each loaf was baked at 230°C for 30 minutes. The internal temperature was close to 100°C but the bottom was less crisp than I had expected with the stone. The crust was absolutely beautiful...
but the crumb structure wasn’t quite as good as before, perhaps because of the rising and proving conditions, but and the smell very good.
Friday 9 February 2007 14:30 On the 7 February, I fed the spare batch of starter with two small doses of flour and then at bedtime with 2½ cups each of strong flour and water. At 8:00am on the 8 February the mixture was very bubbly and glutenous, and was floating on top of a layer of liquid. I stirred it thoroughly and fed it with one cup of strong flour. The total weight was 2144 grams. This was split into two equal batches of about 1070 grams using the trusty digital scales (magic, this: put an empty bowl on the scale and switch on or press the Tare button; remove the bowl and the dial reads ’-257g’; pour some sponge in and put it back on the scale to read the exact weight of what you’ve put in; use a spoon or ladle to adjust either way - gloopy as my mixture was, I managed to split it accurately to within 5 grams). The first half was then developed into a dough by adding and mixing in first one cup of Doves Farm organic plain (soft) flour mixed with one tablespoon of fine sea salt. A further cup of the same flour, then another half cup, were added, and then two lots of 25 grams and finally a few more sprinkles of flour were added during normal kneading, which was done vigorously for 15 minutes. The dough was sticky and quite difficult to manage, but I was able to round it and put it to rise under a damp cloth.
The cold weather meant quite long rising times, during which I had time to sample yesterday’s bread. A bit rubbery, and definitely too salty, so a decision was made... I made the second batch of dough without salt but otherwise following the same procedure. I then punched back the first (salty) batch, rounded it again and cut it in half, before rounding and halving the newer unrisen batch. Half of the first batch and half of the second were kneaded together and put to rise. Then the other two halves were kneaded together and put to rise. And - finally - there was no more starter or sponge to worry about! One ’new batch’ was then made into rolls. The trick here is to round again, cut as accurately as possible into two equal halves using a very sharp knife and round each again. This is where rounding really comes into its own, because you can keep ’burying’ the wetter cut surface in the middle of the dough, leaving the slightly drier (and thus easier-to-handle) surface on the outside. So, that’s two rounded balls. They were halved again and rounded into four balls. Then again to give eight. And finally once more to give 16. At this stage, the final shaping is done by cupping your hand over the ball like a cage and moving it round in small circles: the ball rotates in the opposite direction and comes out really round. At this point I always think the balls are too small, but they usually confound me by rising fine! The balls were touched down onto some Tuxford Farm whole-grain semolina and then arranged in four rows of four on a flat aluminium baking sheet which had also been dusted with semolina. At this point there was clear space between all the balls, and they were left on top of the cooker under a damp tea-towel to rise. They took about an hour and a half to reach what seemed like a good size - all touching and welded together by then. They were dusted generously with semolina and a single deep slash was cut across each. They were then left while a tray of boiling water was put on the bottom of the hot oven (230°C) and the sheet was then placed on the hot baking stone. A quick spray of water ropund the back and sides of the oven, and off they went. After a few minutes I could clearly see that the slashes had opened and the dough inside was rising to fill them. A couple more sprays, and after ten minutes the thermostat was dropped to 190°C. At the end of 25 minutes the rolls looked and smelled great. They were slid onto a cooling rack and left to cool. Meanwhile (that is, after the rolls had been put to rise) the remaining batch was made into four ’mini-loaves’, because it seemed daft to cut bigger loaves in half to freeze. This meant stopping the round-halve-round-halve-round routine when four equal balls were ready. Then each ball was flattened into a thick disc. One edge was folded into the middle and pressed down with the edge of my hand. The the opposite edge was folded and pressed down on top of the first. Finally, the result was folded in half and rolled to trap the fold underneath. A bit of gentle nudging produced a sort of stumpy baguette shape. Two mini-loaves were placed on a generous bed of semolina on each of my two wooden peels and covered with a dampe tea-towel. By the time the rolls were baked, the loaves had increased considerably in size, though because they were bigger than the rolls and the dough was very soft they had become quite flat. As with the rolls, they were dusted with semolina and slashed deeply - three or four times diagonally across each. They were baked in the same way, and miraculously they pulled themselves into shape - a nice round cross-section. It’s noticeable how easily the loaves pull themselves free of the stone to take their own natural shapes. Both the rolls and the loaves looked beautiful - you really wouldn’t be surprised to see a finish like this on a French baker’s shelves. And the crust is excellent. Just before writing this I defrosted two of the rolls in the microwave and ate them for lunch. As Linda predicts, using soft flour makes the crumb more open and holey. The crust was both crunchy and chewy - might be better defrosted in a hottish oven - and the flavour was excellent. I’m still not conscious of a particular sourdough taste, but the bread is a whole lot nicer than any of the stuff I’ve made with beer yeast. The mathematics of sourdoughSo that I’d be able to experiment with more control, I decided to metricate Linda’s recipe before going any further. I wanted to make pizza with our grandson on the 14 February 2007, so the day before I started a new active sponge from the stash of starter in the fridge. This was fed with a cup each of plain flour and water when taken from the2 stash and 2½ cups each of plain flour and water at bedtime. A further cup of each was added on the morning of baking day. Taking a cup to be 250ml, I weighed 500ml of starter/sponge with our wonderful new digital scale at 520g, giving a value for one cup of 260g. I then weighed a cup of flour at 160g. It seemed strange that adding lighter flour to heavier water produced something slightly denser than the water, but of course flour is not a solid chunk: there are countless spaces between the grains, and water is also absorbed into each grain. Then there’s been lots of fermentation activity in which carbon dioxide and alcohol (both much lighter than either flour or water) are lost...anyway, I decided to accept the figure of 260g. The ratio of water to flour going into the starter/sponge is 250:160 (1.5625), so I assume that for the following metrication of the basic bread recipe. Sourdough pizza and garlic breadThis is how the recipe worked out:
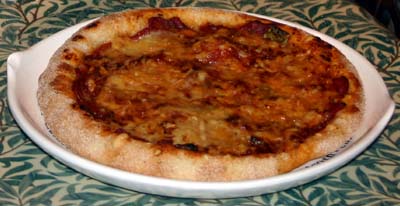
This gives a total of 1030g flour to 415g water. This compares with 1000g of flour to 700g of water in Bertinet’s recipe, so we have to assume that a great deal of flour is actually ’consumed’ (radically changed, anyway) during the life of the starter and the sponge. So the usefulness of all this maths is highly questionable - but at least it tidies up the recipe! The dough was raised in a covered bowl, then lightly kneaded and rounded. It was cut into two and the halves rounded, and then each piece was cut into two and the quarters rounded again. They were placed under a damp tea-towel to rest for a few minutes. Each of the first two quarters were then pressed into a thick circular pattie, sprinkling generously with whole-wheat semolina. They were rested and flattened several times until approximately the right size for pizzas, leaving a small raised edge on each. Finally, the two wooden peels were sprinkled with semolina and the bases moved onto them. They were left under the damp tea-towel to rise. The peel was shaken at regular intervals to ensure that the lubricating layer of semolina was doing its job. Two toppings were prepared:
The toppings wer spread on the two bases - one Pizza Margherita and one Italian Garlic Bread - and both were sprinkled with some mixed grated Gruyère and Cheddar left over from a previous recipe. The oven, with the baking stone in place, had been pre-heating at 230°C for over an hour. The Garlic Bread was slid onto the stone first and baked for about eight minutes. It was then removed and the Margherita was given the same treatment.
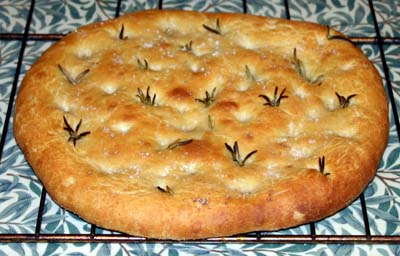
This is compromise pizza-cooking, because the oven was still not really hot enough (it was cooked at 230°C, whereas real pizza ovens can hit 500°C), but Patricia, our grandson and I all agreed it was the best pizza I had ever made (which may not be saying much), and that for home-made it was very enjoyable, with a dry underside, reasonably firm dough under the topping (you could pick a slice up and eat it easily in your fingers) and nice crunchy crust round the edge. But it was a long way from from a proper Italian pizza, thin and crisp with that lovely blackening on the edge. So what’s next? No water-dish was put in the oven and there was no spraying - maybe a mistake. However, I intend to try a version of Heston Blumenthal’s technique, developed for the book and TV series In Search of Perfection. He used a cast-iron frying pan instead of a stone, preheated on the hob and upturned under his grill, and managed to get his pizza cooked in a couple of minutes. I’ll try preheating the baking stone under the grill. The main question is whether there’s a thermostat in our cooker’s grill compartment that cuts the grill off if things get too hot... Grill testDuring a coffee-break after writing the above I turned the grill on to its highest setting, put the oven thermometer on the floor of the compartment and shut the door. After nearly 20 minutes (with checks at regular intervals) the thermometer was reading 260°C and the element was still red-hot. That’s enough to suggest that the grill should be a better pizza oven than the oven itself, so the next pizza will definitely be cooked there. It may be that the temperature will go quite a lot higher than this while the stone is heating. A bit of baking scienceWe need to be a bit careful about the physics here. In our fan oven it’s reasonable to assume that the circulating hot air is the main medium for the transfer of heat to the food. Using the stone complicates this, because the underside of the bread is being heated by conduction, and since wet dough is certain to be a better conductor of heat than air (which is actually rubbish at the job - if it wasn’t, duvets wouldn’t keep us warm at night) - even the forcibly-circulated air of the fan oven, which (as is well known) heats food more effectively than the convected air of a conventional oven. However, there will also be some radiation from the top and walls of the oven into the top and sides of the bread. I have no tools to measure the proportions of air-conduction, stong-conduction and radiation - even if I wanted to get into the pure science. In the grill compartment, with the stone in place and the door closed, there will be air-conduction (though possibly less than with forced air), stone-conduction and fierce radiation from the grill element above. Indeed, it may be that the thermometer is giving a false reading because its metal is being heated by element-radiation more than by air-conduction (I have an ongoing debate with my French friend Bernard, who insists of leaving his patio thermometer in the sun and proudly tells me that it’s 45°C at his house!). I suspect that a wood-fired brick oven delivers more radiation than a metal one. It can certainly deliver the heat, at up to 500°C. But I don;t really want to build one in the garden at the moment. Anyway, never mind the details of the science - it’s the practical effects that I want to control. And the proof of the pudding, as they say... The aim with the pizza is to get the dough baked very fast without over-cooking the topping, and this experiment has at least confirmed that the grill is, in whatever way, a hotter place to bake pizza than the oven. And Heston Blumenthal’s experiments suggest that his technique can cook a pizza in 90 seconds. He does say that his frying pan can get a lot hotter than a ceramic stone. He also says you should have the baking surface as close to the element as possible. We shall see... While drinking my coffee and waiting for the grill to heat up, I was reading the chapter on bread in Harold McGee’s magnificent source book On Food and Cooking: the Science and Lore of the Kitchen. He says (among countless other fascinating things) that the optimum temperature for baking bread (not pizza, which is a very special case) is between 205°C and 220°C. This is to do with arcane issues like the setting of gluten and starch. Richard Bertinet, in Dough, tells us to preheat our oven to 250°C. Linda Wilbourne recommends 205°C (the bottom end of McGee’s range), but also says that sourdough bread is notoriously difficult to brown (which is certainly not my experience at 230°C. Whom to believe? The answer must lie in practical tests. In a nutshell, what McGee tells us is as follows... Stage one of baking takes the temperature of the bread up to 60°C. During this period, the yeast cells become more active, producing more carbon dioxide, and the gases in the dough expand, so the bread rises. If the temperature is too high a crust will form too quickly, inhibiting this rise and leading to denser bread. Stage two takes the centre of the bread to its maximum temperature, close to the boiling point of water (100°C), which cannot be exceeded until the bread dries out completely. During this period, the starch gelatinises (at 60°C) and the gluten coagulates (at 71°C). The result is a stable dough. Stage three completes the starch and protien changes and is when the browning reactions occur in the crust and the characteristic flavouring compounds migrate into the centre of the bread, affecting the flavour of the whole loaf. Interesting, Linda recommends checking the internal temperature and stopping baking when it reaches the high nineties Celsius - maybe this is why she has problems with browning. After all the science, McGee takes us back to the good old empirical check - tap the bottom of the loaf, and if it sounds hollow it’s done. If nothing else, McGee’s chapter shows just how good the human race has been at harnessing incredibly complex chemical and physical processes without having the faintest idea how they work. This goes to show that you can’t beat trial-and-error - which is, after all, the basis of evolution, and that managed to produce the human race. Left-over spongeSaturday 17 February 2007 17:30 This was taken out of the fridge yesterday afternoon and given a small feed of the left-over contents of a bag of Dove’s Farm plain flour. This morning, Tuxford strong bread flour was stirred into the sponge at various intervals over a period of a couple of hours, leaving it to show signs of active fermentation each time (while we watched Saturday Kitchen and Bill’s Food on BBC TV. Then it was developed into a sticky dough with cautious additions of strong flour together with 2 tablespoons of extra-virgin olive oil and 1½ tablespoons of fine sea salt. The dough was at the absolute limit of stickiness for the 15-minute French knead it was then given. This was done with a positive effort to trap as much air as possible on every fold. At 13:15 the resulting 2185 grams of dough was put to rise at room-temperature in a bowl covered with a damp tea-towel. During kneading there was a noticeable smell of acetic acid (vinegar), which with lactic acid is one of the two products of Lactobacillus Sanfrancisco’s contribution to fermentation. The long neglect seemed to have changed things a bit. After just over two hours it was rounded, cut into two halves and rounded again. One half was cut into two again and rounded. Three quarters were put back in the bowl and covered, and the fourth was made into a round flat shape similar to a pizza base, finishing with it on a peel well lubricated with semolina. Sprigs of rosemary were embedded in the top, olive oil wiped over with the fingers and a generous amount of the delicious Fleurs de Sel de Guérande (naturally dried sea salt from the French Atlantic coast) was sprinkled on.. It was then left to rise on top of the stove. When risen, it was drizzled with more olive oil and transferred to the hot stone in a 230°C oven with a pan of boiling water in the bottom. Baking took about ten minutes, with the dough rising well.
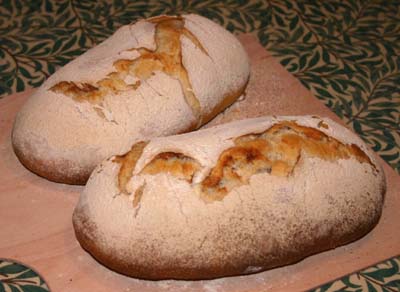
The focaccia was cut as soon as it was cool enough, and with the large amount of olive oil it had absorbed and the crisp crystals of salt it was delicious, though perhaps a little chewy. The remaining dough was quartered and made into four mini-loaves, two on each peel. Long slashed loaves were shaped as before. These went very flat on the peels. The first pair were sprayed with water before putting them in the oven, and thentwice more at about 2-minute intervals, in the hope of getting a really good crisp crust. The results were very satisfactory:
The second pair were dusted heavily with flour before baking. As can be seen, without slashing the crust burst as the loaves rose - not very controlled, but quite attractive in a rustic kind of a way!
All four loaves went straight in the freezer, so I haven’t had a look at the crumb texture, but they certainly rose very well. Given the undisciplined way this batch of bread was made, it looks very promising. I think it’s possible to take some pretty diabolical liberties with the San Francisco Starter and still produce excellent breads. The freezer is now more-or-less full, as I’ve been baking bread fast than we’ve been eating it, so I think we’ll have to concentrate on consumption for a while - apart from the one outstanding experiment: the frozen dough.
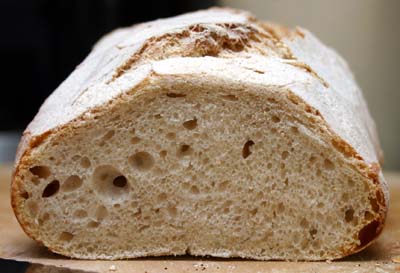
19 February 2007 Here is one of the results of my liberty-taking: a floured loaf from the last batch. The crust is crisp, but not as harsh on the mouth as most of the previous efforts. This may be partly due to the addition of olive oil, but also perhaps to the lower baking temperature. The crust has a very nice bready smell - partly from the flour, maybe - with an almost buttery edge, perhaps from the oil. Very pleasant eating. As the picture shows the texture is open and varied, probably from the deliberate trapping of air and the lack of any real kneading after the first rise. The crumb is firm and elastic, recovering completely when a finger is pressed into it. The most impressive thing is how well it recovered without re-baking after a couple of days in the freezer and a quick defrost in the microwave. 20 February 2007 The part-eaten loaf was left, cut face down, on the breadboard, and this lunchtime I had some with some cold beef (actually left-overs from two very large rib-eye steaks) and then with our French friend Annick’s wonderful apple jelly. The crust had softened a bit, and the inside was a little drier, but there was no stale taste and the bread was still very enjoyable. Thinking aheadMonday 5 March 2007 Having eaten bread from several separate bakings over the past few weeks, I’ve found that - while I’m getting good-looking crusts of various types - the insides of the loaves and rolls tend to be a little tough and rubbery. I’m wondering whether the long drawn-out preparation of the active starter and the sponge is resulting in the consumption of too much starch by the sourdough micro-organisms. All the water (except, perhaps, a last cup added if the sponge is fed in the morning before the dough is finished, and ignoring the half-cup from the stored starter) and around a third of the total flour have been in the mix for between a couple of days and twelve hours. During this time it’s obvious that major changes have taken place in components of the flour because the proportions of flour and water used in the recipe are quite different from those in conventional yeast bread. Some of the recipes at http://www.sourdo.com/culture.htm seem a bit less extreme, so I’m wondering if it would be possible to shorten the period from start to sponge, simply getting the starter fully active in as small a quantity as possible and then preparing the dough. Obviously the initial rising of the dough will then take a lot longer as the micro-organisms will have to multiply, but the result will be that only enough starch will be consumed to produce the gas needed for the rise. Also the proteins in the flour will not have been subjected to such prolongud soaking in an excess of water. The next project will therefore be to wake up half a cup of stored starter with half a cup each of flour and water (possibly repeating several times to maximise the populations of yeast and lactobacillus), top up to the full quantity of water, add half the expected quantity of flour to produce a sponge and as soon as this is obviously fermenting add the remaining flour with the salt and proceed as for ordinary yeast-based bread. It could be a disaster. We shall see... Not very sour doughWednesday 7 March 2007 I mentioned on this page, and to Linda Wilbourne via email, that my starter didn’t smell very sour and the bread didn’t have the distinctive flavour I’d been led to expect. Linda has suggested that the lactobacillus population may have been killed off and has very kindly sent me another starter. I’m not sure, so I’m going to keep the original going for a while. It may be that the lactobacilli have been weakened or reduced in number (chlorine in UK tap water?), so I’m thinking of working the starter for a few days on regular feeds before using it again. Meanwhile, on Linda’s recommendation, I’ve consigned the dry starter, still in its paper packet and inside a plastic bag, to the freezer. Thursday 22 March 2007 Yesterday I took the starter out of the fridge, poured it into a bowl and fed the whole starter a cup each of water and strong flour. When this was looking active again I took two one-cup batches and fed each in a separate bowl, taking the opportunity to wash the kilner jar for the fridge thoroughly. Last night I fed a cup of each again, dutifully - and reluctantly! - tipping the rest down the sink. By this morning both batches were very frothy - quite different from previously, so maybe I’ve been trying to work with a half-developed culture...? I mixed a feed in each of two clean bowls and added one cup of the fridge starter to one and one of the spare one to the other. After mixing, I returned the fridge starter to the Kilner jar and left the other in its bowl. The jar will go back in the fridge later, but the other will be fed for a few more days. I think the mixtures now have a much more sour smell than before, so maybe I’ve finally got the lactobacillus half of the partnership up-to-speed. As an experiment, I asked Patricia to sniff the mix and tell me what she smelled: first, she said ’Cream’ and then corrected herself to ’Crème fraîche’, so she was obviously getting the sourness. 14:00 The kilner jar of starter (my insurance policy) is now back in the fridge, and I’m watching for fermentation in the bowl to reach a peak. I intend to keep feeding this batch for several days in an attempt to optimise the flavour. I’ll make a batch of rolls with one cup, but maybe keep another going... Monday 26 March 200710:00 Last night I dumped the experimental batch, to which I’d been adding flour but only water when it got too thick to feed. I’d been feeding the ordinary starter a bit haphazardly, but at least twice and usually three times a day (at room temperature rather than in our hot utility room) and it seemed OK. This morning I split off half a cup and fed it as usual, and then added a cup of flour to the rest. The plan is to add this to 700ml of warm water (the normal amount for 1kg flour), add 500 grams of flour and leave the resulting sponge until it shows healthy activity and then make dough normally with about another 500 grams of flour. The aim is to avoid what I think may be the problem with the texture of my bread: too much flour is mixed with too much water for far too long, possibly using up too much starch or gelatinising it and so producing a heavier, more rubbery consistency. We shall see... 12:30 At 12:20 the starter was whisked into 700ml of water at about 27°C and 500 grams of ordinary plain flour was whisked in to make a fairly thick batter. This was covered and left to stand on a sunny windowsill. After an hour there were a few bubbles, but nothing very vigorous. However, I was keen not to let a wet mixture stand too long for the reasons given above, so I added 30 grams of melted butter, one tablespoon of fine sea salt and, 100 grams at a time, ordinary plain flour. To achieve a dough that was just manageable took 700 grams of flour. Tuesday 27 March 10:00 After about three hours a good rise had been achieved so the dough was scraped out of the bowl, rounded and cut in half four times, rounding after each cut, to produce 16 large rolls. These were rolled in spelt flour and arranged on three non-stick baking tins sprinkled with more spelt flour. They were left to prove, covered with a damp tea-towel, for between two and three hours, then slashed and baked for 25 minutes at 220°C. The rolls had joined together during proving, and when torn apart to pack for freezing the inside looked and felt quite light. Meanwhile, keeping the reserved starter fed and watered. Defrosting two rolls to try at lunchtime... 12:00 A thought Now I’ve successfully bypassed the long and bulky sponge process, I’m wondering whether I could go all the way. When feeding the starter, I take just 125ml of the active mix and feed it, so why not go straight to the sponge with this - that is, add 700ml of water and 500g of flour to 125ml of active starter and then make the dough as soon as some fermentation is observed? Obviously it will take longer for the population of yeast and bug to grow, but it will be doing this in a much drier environment. This will be interesting, as it’s a reversion to to process used with commercial yeast - only the micro-organisms will have been changed. 14:00 The two rolls were heated for five minutes in a hot oven. The crumb structure was at least as good as previously, but still maybe a bit heavy. Perhaps I’m comparing the lightness with commercial bread, which we know isn’t raised with yeast at all, but with mechanically beaten-in air. Still lacking the famous sourdough taste, though, but good bread. So I’ll go ahead with the next stage as outlined in the previous paragraph. Friday 30 March 2007 The new starter was fed one last time this morning and the old one tipped out of the kilner jar. The new one was allowed to become fully active and then put in the fridge. This has been fed at room temperature for eight days before chilling. Thursday 3 May 2007 In the past couple of days we’ve eaten several of the last batch of rolls, defrosted in the microwave. In terms of texture and flavour they’re the best I’ve made since starting the sourdough project, so it seems my experiment with less starter has been a success. Only the ’famouse sourdough taste’ is missing, so maybe it’s time to use Linda’s replacement starter... Wednesday 8 August 2007 The refrigerated starter died of neglect and was discarded, so on return from a holiday in France last week I activated the replacement sent by Linda. This took off very vigorously during a spell of very hot weather, benefiting particularly from double feeds to keep it alive overnight. It has a much stronger lactice-acid smell, which I assume is the elusive ’famoud sourdough’ smell. After a few day consuming most of my remaining stock of Tuxford Windmill Strong White Flour it has now been consgned to the fridge. I’m reluctant to clamp down the lid of the kilner jar after over 24 hours as it still looks very thick and bubbly. I hope this is going to be the real deal. Watch this space... Monday 14 March 2011 I hope you didn’t keep coming back here looking for more, because injuries and other pressures meant that I never recorded what I baked with the second of Linda’s starters. In fact, it produced more very good bread, but then the project went on a very long hold. Now, as I said at the top of the page, I’ve done some very different sourdough work on one-day course, and will be reporting on this and subsequent baking soon. |
Personal site for Paul Marsden: frustrated writer; experimental cook and all-round foodie; amateur wine-importer; former copywriter and press-officer; former teacher, teacher-trainer, educational software developer and documenter; still a professional web-developer but mostly retired. This site was transferred in June 2005 to the Sites4Doctors Site Management System, and has been developed and maintained there ever since. 
|
|